


When your beloved phone screen suddenly cracks or its battery life plummets, have you ever looked at the repair shop’s quote of several hundred dollars and thought: “What if I could fix it myself?”
That idea isn’t far-fetched. In fact, with the rise of professional toolkits like the X1-I Electric Screwdriver Set, DIY electronics repair is no longer limited to experts.
Why Repair It Yourself?
Save Money: Replacing an iPhone screen through official channels can cost over a thousand yuan — doing it yourself cuts that expense by more than half.
Control Your Time: No appointments or waiting. Finish the repair in just two hours at home.
Choose Your Parts: Pick original or high-quality replacement parts yourself.
Learn a Lifelong Skill: Gain practical knowledge you’ll use again and again.
The Right Tool for the Job: What Makes the X1-I Ideal for Electronics Repair
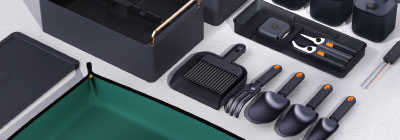
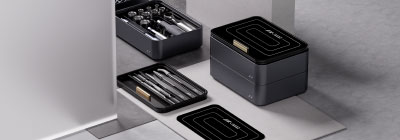
To do good work, one must first sharpen one’s tools. The X1-I Electric Screwdriver Set is tailor-made for electronics repair:
-
39 S2 Alloy Steel Bits: Covers special screws used in Apple, Samsung, Huawei, and other major brands.
-
Precise Torque Control: 5 adjustable torque settings (up to 4 N·m), with the lowest at 0.8 N·m to protect delicate components.
-
Magnetic Long & Short Bits: Easily access deep-set screws. The PH2 bits fit most consumer electronics.
-
Professional-Grade Tools: Includes a metal pry bar for non-destructive case opening and a flexible shaft for hard-to-reach areas.
Step-by-Step: Replacing a Smartphone Screen
Before You Begin
-
Gather your tools: X1-I set, replacement screen, suction cup, opening picks.
-
Work in a clean, well-lit space.
-
Wear an anti-static wrist strap and power off the device completely.
Disassembly Process
-
Gently heat the edges of the screen with a hot air gun (70–80°C) to soften the adhesive.
-
Attach the suction cup and carefully lift a small gap. Slide an opening pick inside.
-
Slowly work your way around the display, cutting through the adhesive. Avoid the flex cable areas.
-
Lift the screen open at a 30-degree angle.
Critical Tips
-
Disconnect the battery first to prevent short circuits.
-
Use the correct bit size to avoid stripping screw heads.
-
Keep screws organized and note where each one goes.
-
Handle front camera, sensors, and other small components with care.
Reassembly
-
Test the new screen before final installation.
-
Thoroughly clean old adhesive from the frame.
-
Apply a new layer of waterproof adhesive evenly.
-
Reinstall all components in reverse order.
Other Repairs You Can Tackle with the X1-I
Beyond screen replacement, this set equips you for:
-
Battery Replacement: Use the flexible shaft to access deeply embedded screws.
-
Camera Module Repair: Precise torque prevents damage to delicate ribbon cables.
-
Logic Board Repairs: Multiple socket sizes fit a variety of nuts and standoffs.
-
Laptop Cleaning & Maintenance: Long bits help reach internal screws.
Safety First: A Few Words of Caution
-
Always disconnect power before starting.
-
Handle small components gently.
-
Use the appropriate torque — don’t force anything.
-
When in doubt, seek professional help.
Related Products


1 Comment(s)
1
1
Leave a Comment